Hello fellow yarn enthusiasts! Get ready to infuse your life with a splash of sweet, fruity charm because today, we’re diving into the delightful world of the Crochet Strawberry Stitch! Imagine tiny, plump strawberries, their textured surfaces bursting with vibrant color, adorning your projects like little edible gems. This stitch is an absolute delight to create and even more satisfying to behold!
Whether you’re a crochet beginner looking for your next exciting stitch to master, searching for the perfect handmade gift that’s both adorable and thoughtful, or dreaming of adding some whimsical flair to your home decor, this strawberry stitch is your new best friend. In this tutorial, we’ll guide you step-by-step through creating these cheerful little berries, transforming them from simple yarn into miniature works of art. Grab your hook and some lovely red and green yarn, and let’s craft some happiness together!
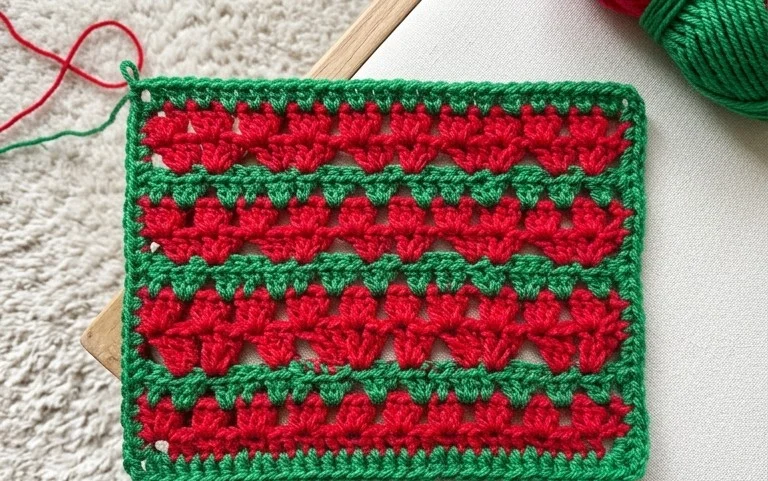
Crochet Strawberry Stitch Tutorial: Crafting Happiness, One Berry at a Time!
Welcome, fellow crafters, to a delightful journey into the world of crochet with our Crochet Strawberry Stitch Tutorial! If you’re looking to add a burst of fruity charm to your projects, this stitch is an absolute winner. It’s surprisingly simple yet yields a stunningly textured result that truly resembles a plump, juicy strawberry. Whether you’re a seasoned crocheter or just dipping your toes into the yarn craft, this tutorial is designed to guide you every step of the way, helping you craft happiness, one adorable berry at a time.
Getting Started: Your Strawberry Stitch Toolkit
Before we dive into the stitch itself, let’s make sure you have the right tools for the job. Choosing the correct yarn and hook is crucial for achieving that perfect strawberry look.
Yarn Recommendations
The beauty of the strawberry stitch lies in its ability to mimic the natural texture of the fruit. For this, we recommend yarns that have a slight sheen and a good stitch definition.
Cotton Yarn: This is our top pick for strawberry-themed projects. Cotton yarn provides excellent stitch definition, making the textured bumps of the strawberry pop. It also gives a lovely, slightly rustic feel and is breathable, making it perfect for home decor items and accessories. Look for a medium weight (worsted weight or Aran weight) cotton yarn in vibrant red or pink for the berry itself, and a green yarn for the leaves.
Acrylic Yarn: A more budget-friendly and widely available option, acrylic yarn can also work beautifully. Choose a good quality acrylic that isn’t too fuzzy. This will help maintain the clarity of the stitch pattern.
Blends: Cotton-acrylic blends offer a nice balance of softness, stitch definition, and durability.
Color Palette:
The Berry: Shades of red, from bright cherry red to a deeper crimson, are classic choices. For a sweeter look, consider a soft pink or even a variegated yarn with hints of red and pink.
The Leaves/Hulls: A nice emerald green or a slightly darker forest green will provide a lovely contrast. You can also play with lighter greens for a fresh, spring-like feel.
Hook Size
The hook size you choose will depend on your yarn weight and your personal tension.
For Worsted Weight/Aran Weight Yarn: A hook size of 4.5mm (US 7) to 5.5mm (US I-9) is generally recommended.
Check Your Gauge: It’s always a good idea to work up a small swatch with your chosen yarn and hook to see how the stitch looks. If your stitches are too loose and the texture isn’t defined, try a smaller hook. If they are too tight and difficult to work, go up a hook size.
Mastering the Strawberry Stitch: Key Techniques
The magic of the strawberry stitch lies in a few simple, yet effective, crochet techniques. Don’t be intimidated; with a little practice, you’ll be creating adorable berries in no time!
The core of the strawberry stitch involves creating bobbles or clusters that protrude from the fabric. For our tutorial, we’ll be using a modified bobble stitch.
The Strawberry Bobble (or Cluster)
This is the technique that creates the signature “berry” look.
1. Yarn Over (YO): Insert your hook into the designated stitch. Yarn over and pull up a loop.
2. Repeat YO and Pull Up a Loop: You’ll typically repeat the YO and pull up a loop for a specific number of times within the same stitch, creating a significant number of loops on your hook. For the strawberry stitch, we usually aim for 4 or 5 partial double crochets worked into the same stitch.
3. Yarn Over and Pull Through All Loops: Once you have the desired number of loops on your hook, yarn over and pull through all of the loops. This closes the bobble, making it pop out from the fabric.
The Connecting Stitch
After forming the strawberry bobble, you’ll usually work a stitch to secure it and create space before the next bobble. This is often a single crochet (sc) or a chain stitch. The choice here can influence the spacing and overall look of your strawberry patch.
Single Crochet: Working a single crochet into the next stitch after the bobble creates a tighter fabric and can make the bobbles sit closer together, resembling a cluster of small berries.
Chain Stitch: A chain stitch or two after the bobble creates more space between the bobbles, giving each berry more definition and a slightly looser feel.
Tips for Beginner Berry Crafters
Embarking on a new stitch can feel daunting, but we’re here to help you navigate any bumps in the road. These tips are specifically designed to make your strawberry stitch journey smoother and more enjoyable.
Start Small: Don’t jump into a large blanket right away. Practice the stitch on a small swatch or a simple coaster. This allows you to get a feel for the stitch without committing to a big project.
Count Your Stitches: This is paramount when working with textured stitches. Keep a stitch count at the end of each row to ensure you haven’t missed or added any stitches, which can significantly affect the pattern.
Tension, Tension, Tension: Consistent tension is key to a neat and even fabric. Try to hold your yarn and hook in a comfortable and consistent way. If you find your stitches are too loose or too tight, adjust your hook size accordingly.
Learn Your Abbreviations: Make sure you understand standard crochet abbreviations (sc, ch, YO, etc.). This tutorial uses them, and they are universal across most patterns.
Watch Video Tutorials: Sometimes, seeing a stitch worked in real-time is the best way to understand it. Search for “crochet strawberry stitch video tutorial” online; many talented creators have visual guides that can be incredibly helpful.
Don’t Be Afraid to Rip Back: We’ve all been there! If you notice a mistake a few rows back, it’s often better to carefully unravel (frog!) your work and fix it than to try and work around it. It’s part of the learning process.
Use Stitch Markers: Place stitch markers in the first and last stitches of your rows, or at key points in the pattern, to help you keep track and avoid accidental increases or decreases.
Customizing Your Crochet Creations
The beauty of crochet is its inherent adaptability. The strawberry stitch is no exception and can be easily customized to suit your personal style and project needs.
Color Play
Varying Reds/Pinks: Experiment with different shades of red and pink within the same project. For example, you could have some rows of bright red berries and other rows of deeper crimson berries on a single item.
Green Accents: Use green not just for the leaves but also for accents within the berry itself, perhaps a few green stitches interspersed with the red to mimic seeds or natural variations.
Ombre Effect: If you’re feeling adventurous, try an ombre effect by gradually transitioning from a lighter pink to a deeper red, or vice versa, over several rows.
Size Matters
The size of your finished strawberry stitch can be adjusted by:
Changing Yarn Weight: Using a lighter weight yarn with a smaller hook will result in smaller, more delicate strawberries. Conversely, using a bulkier yarn and a larger hook will create larger, more pronounced berries.
Adjusting the Number of Partial Double Crochets: While we recommend 4-5 partial double crochets for the strawberry bobble, you can try using 3 for a smaller bump or 6 for a more pronounced one.
Modifying Stitch Repeats: The pattern often involves a specific number of stitches between bobbles or a repeat of the bobble and connecting stitch. Adjusting this repeat can influence the overall size and density of your strawberry patch.
Caring for Your Handcrafted Happiness
Once your beautiful strawberry stitch creation is complete, you’ll want to ensure it stays looking its best for years to come. Proper care will keep your handmade item fresh and vibrant.
Washing: Most cotton and acrylic yarns can be hand-washed in cool water with a mild detergent. Gently agitate the fabric, avoiding harsh scrubbing.
Rinsing: Rinse thoroughly with cool water until all soap is removed.
Drying: Never wring or twist your crocheted item. Gently squeeze out excess water. Lay the item flat on a clean, dry towel. Roll the item up in the towel to absorb more moisture. Then, lay it flat on a drying rack or another dry towel, reshaping it as needed, and allow it to air dry completely. Avoid direct sunlight, which can cause colors to fade.
Machine Washing (with caution): If the yarn label specifically allows for machine washing, place your item in a mesh laundry bag and wash on a delicate cycle with cold water and a mild detergent. Always air dry afterwards.
Avoid Harsh Chemicals: Do not use bleach or fabric softeners, as these can damage the fibers and affect the color.
Project Ideas to Spark Your Creativity
The versatility of the strawberry stitch means it can be incorporated into a wide array of projects. Let your imagination run wild!
For the Home:
Coasters: A quick and satisfying project, perfect for adding a touch of fruitfulness to your coffee table.
Dishcloths/Washcloths: The textured stitch is great for scrubbing and looks adorable in the kitchen.
Tote Bags/Purses: Create a charming bag that’s perfect for summer outings.
Pillows/Cushions: Add a pop of color and texture to your sofa or armchair.
Wall Hangings/Buntings: String together a garland of strawberries for a festive touch.
Wearables and Accessories:
Scarves: A beautiful and unique scarf that will definitely turn heads.
Hats: Embellish a plain hat with a band of strawberry stitches, or create an all-over strawberry pattern.
Bags/Pouches: Small drawstring pouches or makeup bags are ideal for practicing the stitch.
Appliqués: Create individual strawberry motifs to sew onto existing garments or accessories.
For Little Ones:
Baby Blankets: A soft and cheerful addition to a nursery.
Amigurumi: While not a stuffed item, you can create flat strawberry elements to embellish amigurumi toys.
Baby Hats: Adorable strawberry hats for the little ones in your life.
With this detailed tutorial, you’re well-equipped to embark on your strawberry stitch adventure. Remember to have fun, experiment, and most importantly, enjoy the process of crafting happiness, one beautiful crochet strawberry at a time! Happy crocheting!
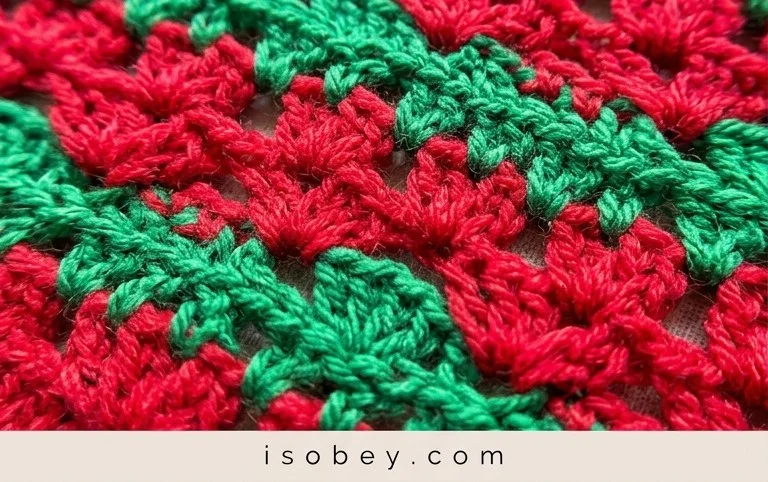
Now that you’ve mastered the delightful crochet strawberry stitch, we hope you’re feeling inspired to craft some sweetness! This stitch is perfect for adding a touch of charm to all sorts of projects. Don’t hesitate to give it a try – you might be surprised at how quickly it becomes a favorite. Once your berry masterpieces are complete, we’d absolutely love to see them! Share your creations on social media and tag us so we can all admire your handiwork.
Feel free to get creative! Experiment with different yarn colors for a rainbow of berries, or try incorporating this stitch into blankets, bags, or even cute amigurumi. For more delightful crochet adventures and to discover your next favorite pattern, be sure to explore the rest of our blog. Happy crocheting!